Creating and managing print jobs manually in this day and age is a lot more monotonous than it seems. Especially if you’re managing multiple stores and products, then it becomes even more difficult to manage print jobs. But not anymore. PrintXpand’ print job manager is at your rescue. With PrintXpand’s Print Job Manager you can do all these tedious, time-consuming, hard to manage manual tasks easily and efficiently. Not only does it help you get rid of manual job creations but also helps you achieve 20X faster efficiency in your print workflow. Print Job Manager increases deliveries, productions, profitability on short-run jobs, and decreases idle machine times, print waste, and human errors. Let’s have a look at some of the key features.
Key Features:
- Work/Job Stages – You can create custom print workflow stages as per your product requirements. You can define different stages as per your product, which would involve all the stages that the product passes through during the printing.
- E.G. If you offer clothing products then you can add stages like design overlayout, dyeing , coloring, packaging, ready for shipping etc.
- Create Order Tickets: You can avoid unnecessary email communication and track the flow throughout by creating job tickets.
- Schedule Jobs: You can define the timeline for the workflow of your orders. You can also download the job sheet with PDFs containing all the job details and print-ready files.
- Job Management: Once you schedule the job, it will be visible to all your department teams. As per the workflow, once they go by each stage, they can update the status to move it forward in the production cycle.
- Interactive Calendar View: You can get a comprehensive view of all the production jobs in Print job manager to manage your printing queues efficiently. You can track job cycles to avoid delays, over-run orders and solve on-time queries fast.
Backend Configurations
This tool can be managed by going to the dashboard and clicking on Job Schedule Icon in the left panel. The Job schedule tab consists of three subtabs. Let’s have a look at it.
![]()
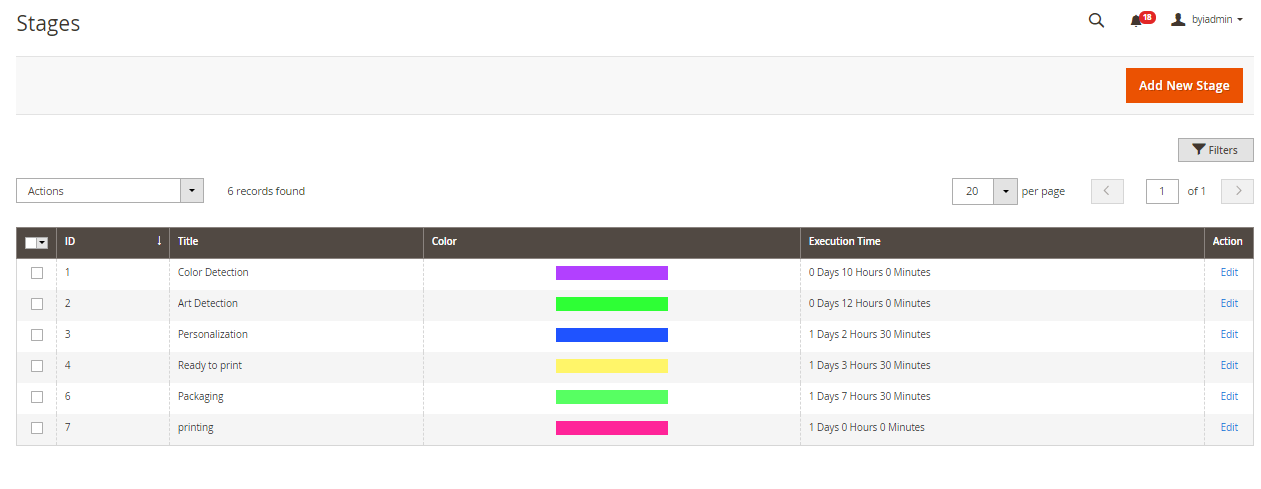
- Stages – There are different stages through which a product passes during its production. You can add/manage all the stages of all the products here with the help of this tab.
E.G. Color detection, artwork detection, personalization, ready to print etc.
To add a new stage:
- Click on the “Add new stage” button. This will redirect you to the Add/Stages Page.
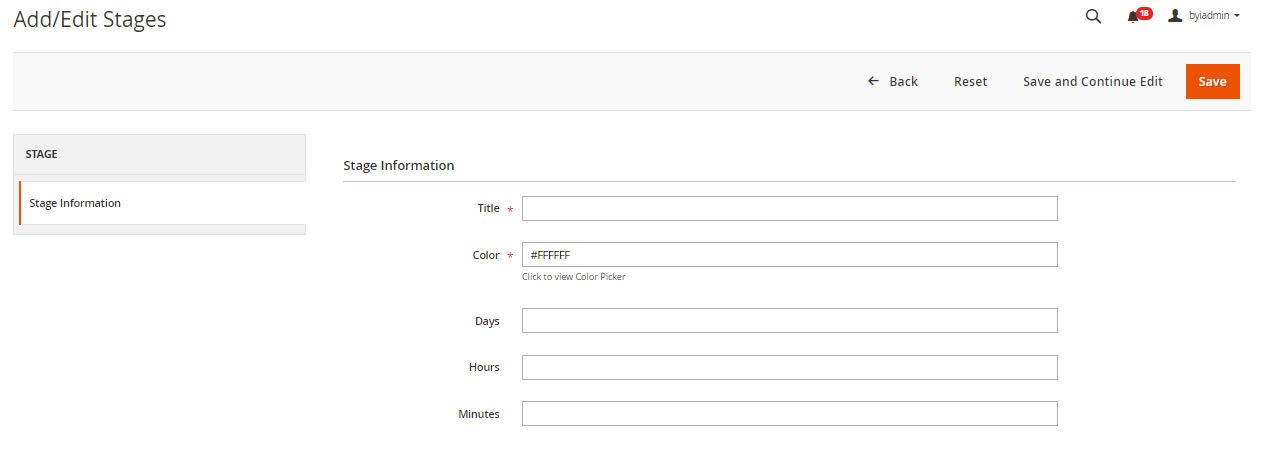
- Add all the Stage Information here. Start with adding it’s title.
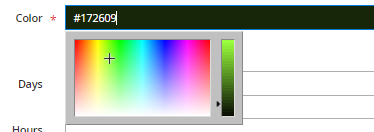
- Add the color. Make sure you assign every stage with a different color. Color wise assigning of stages provides easy identification. You can pick any color you want from the color picker simply by clicking on it.
- Add the execution time (in days, hours and minutes) for each stage.
- After adding all the details click on the “Save” button.
- Workflows: Workflows of various stages can be created based on the product or a group of products. For example the workflow for Ready for packaging stage for a T-shirt making can involve various sub-stages like Bubble-wrapping, Box packaging, labeling etc. So with the help of the workflow option you can create these sub-process for each stage for each product.
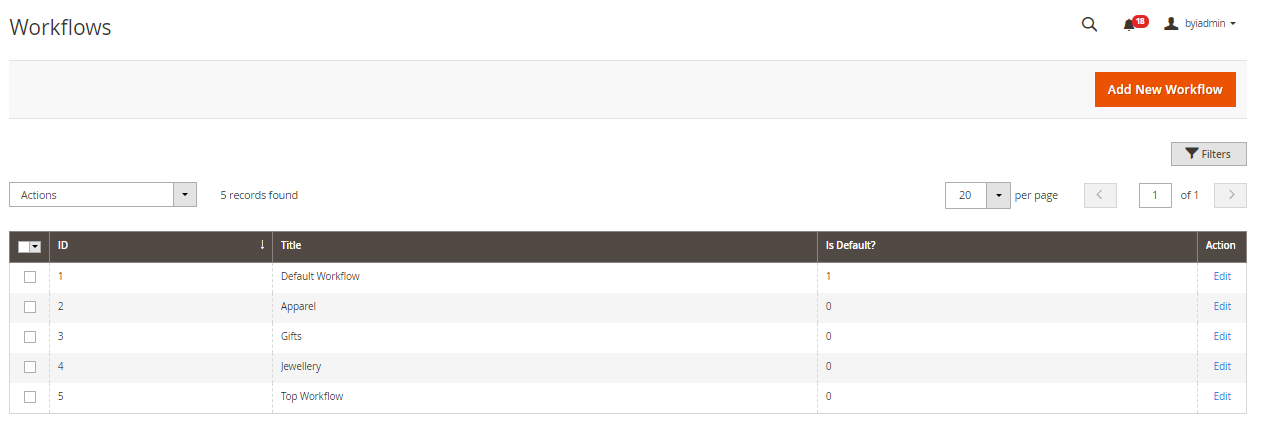
How to create a new workflow?
- Click on create “new workflow” button, which will redirect you to the Add/Edit workflow page.
- Enter the workflow name.
- If you want to set it as default workflow then select the checkbox “Set as default”.
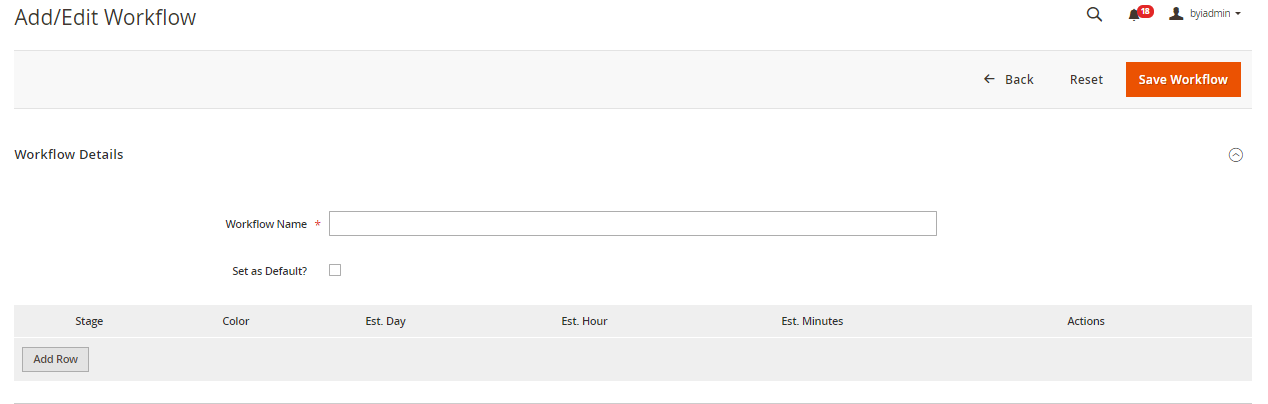
- Click on the “Add row” button.

- All the stages that you have added will be listed in the “stage” dropdown. Select the appropriate stage for which you want to define the workflow.
- Add it’s color denotation and estimated execution time (in days, hours and minutes).
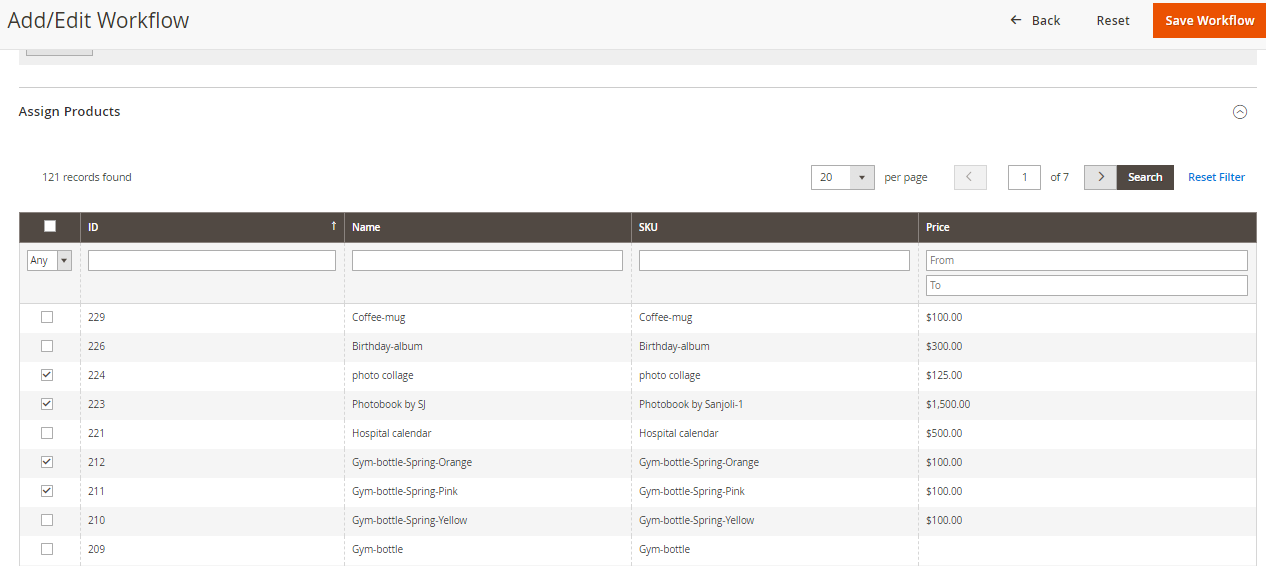
- Then comes the assign products option. You need to assign the products needed for that particular workflow. So now whenever an order related to one of these assigned products is placed, then it will automatically follow this particular workflow.
- Also, there has to be a default workflow so that in case if a workflow for a certain product is not defined then the default process can be carried out.
- You can delete any workflow by clicking the delete button.
- After filling all this information click on “Save workflow”.
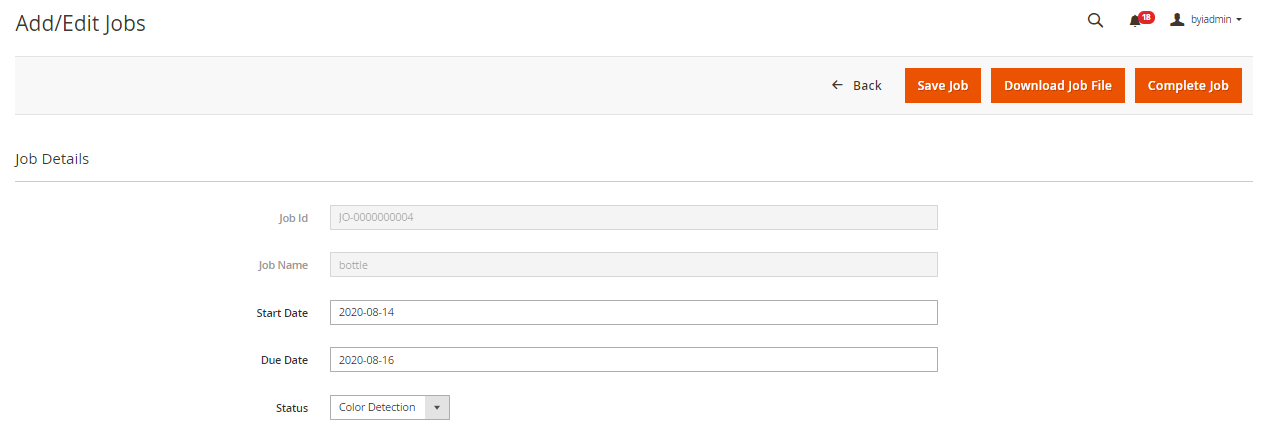
- Manage Jobs: Once the order is placed, the jobs are created automatically and are listed in the “Manage job” section.
- The workflow and stages related to that particular product will be assigned automatically and listed.
- The order ticket is generated automatically based on the workflow assigned to the placed product. The ticket will show the stages and the time that will be needed to complete those stages.
- Barcodes will be generated based on the workflows too. You can search the order details of a particular order by entering the job ID.
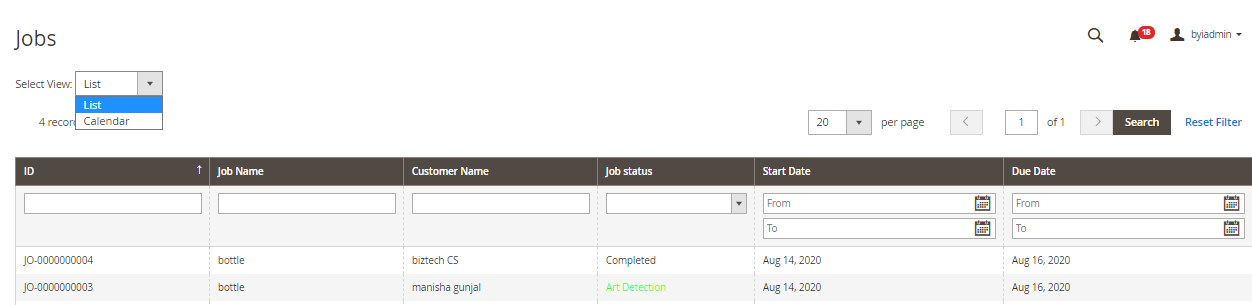
- You can view these job listings by navigating to the Job schedule > Manage jobs option. You’ll be redirected to the Job listing page.
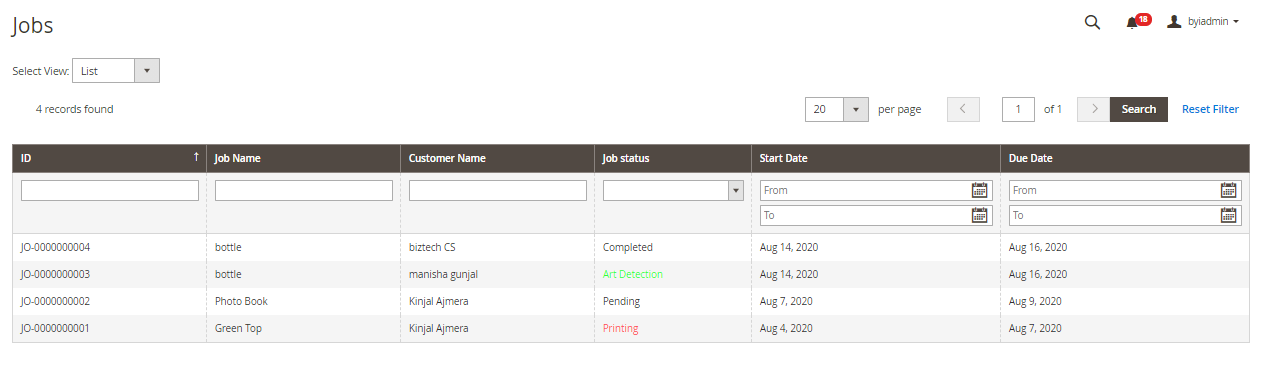
- An entire list of job details will be displayed so that the admin will get a basic idea about the status of the jobs and their due dates.
- The list consists of details like Job name, customer name, job status, start date, end date. The job statuses can be changed manually. So once the job is completed, that job’s status can be changed accordingly.
- To open any job,, you can just click on it and you’ll be redirected to that job page.
- Admins can also download the job ticket, by clicking to download jobs.
- Whenever all the jobs in the workflow are completed, the admin can finally click on the complete job and the product can be sent forward for shipment.
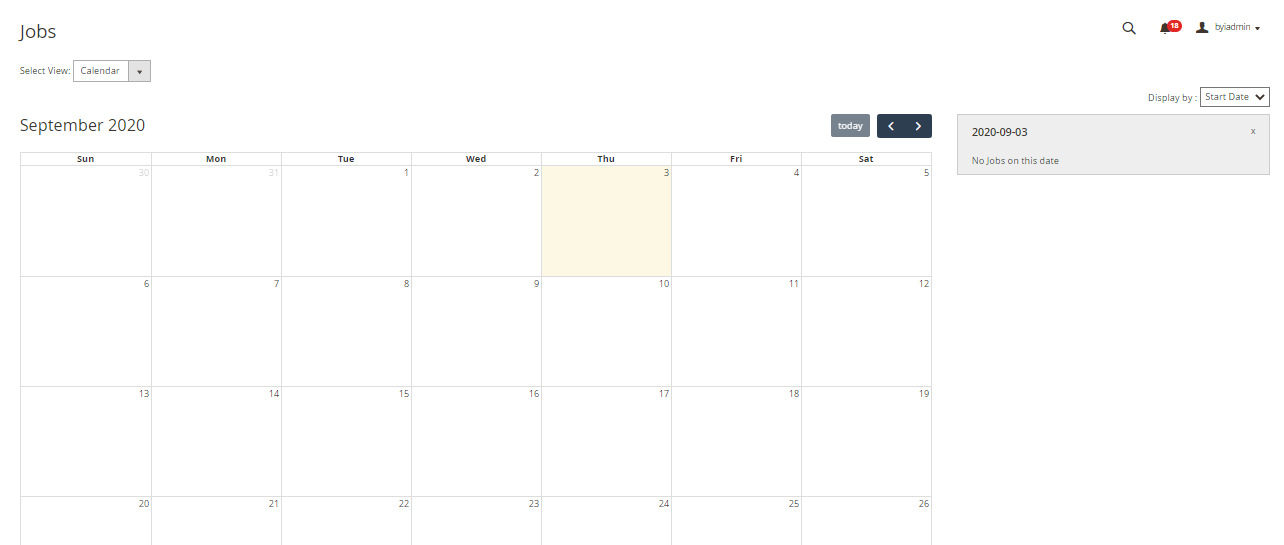
Grid view/ Calendar View: The default view of the job list is in grid view. Magento also provides a calendar view. The calendar view shows an entire calendar and automatically lists all the jobs to be completed for the day.
The colors that you had defined to different stages becomes helpful here. As the calendar view shows the number as well as colors of the jobs done, making it easy for you to recognize the job. When you click on a date it will list all the details of the jobs needed to be done on that day. You can change its start date and status from calendar view as well. Once you change the start date, the end date will change accordingly.