MANAGE NAME NUMBERS
The customers can add their favorite Names & Number together on the product using our PrintXpand Product Designer Tool.
Backend Configuration
You can allow the customers to design the product using the “Name Number” feature. You can enable the Name Number option for both the types of products: Simple and Configurable.
Manage Layouts
First of all, you need to enable “Name Number” option from the Manage Layouts for the specific Theme (Layout). Navigate to the Product Designer → Manage Layouts.
You will see the “Simple Product” and “Configurable Product” options under the Name Number tab. Here, you can decide to enable the Name Number designer either for both typed of products or only for one of them (Simple Product/Configurable Product).
After configuring the layout options, click on the Save button.
Store Configuration
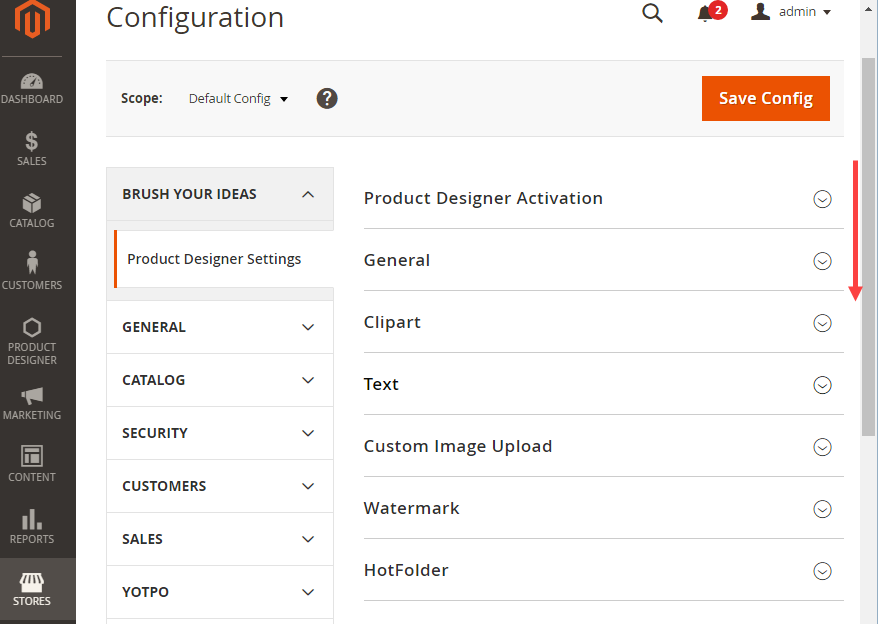
Navigate to the Stores → Configuration (Product Designer Settings) to configure the “Name Number” related options.
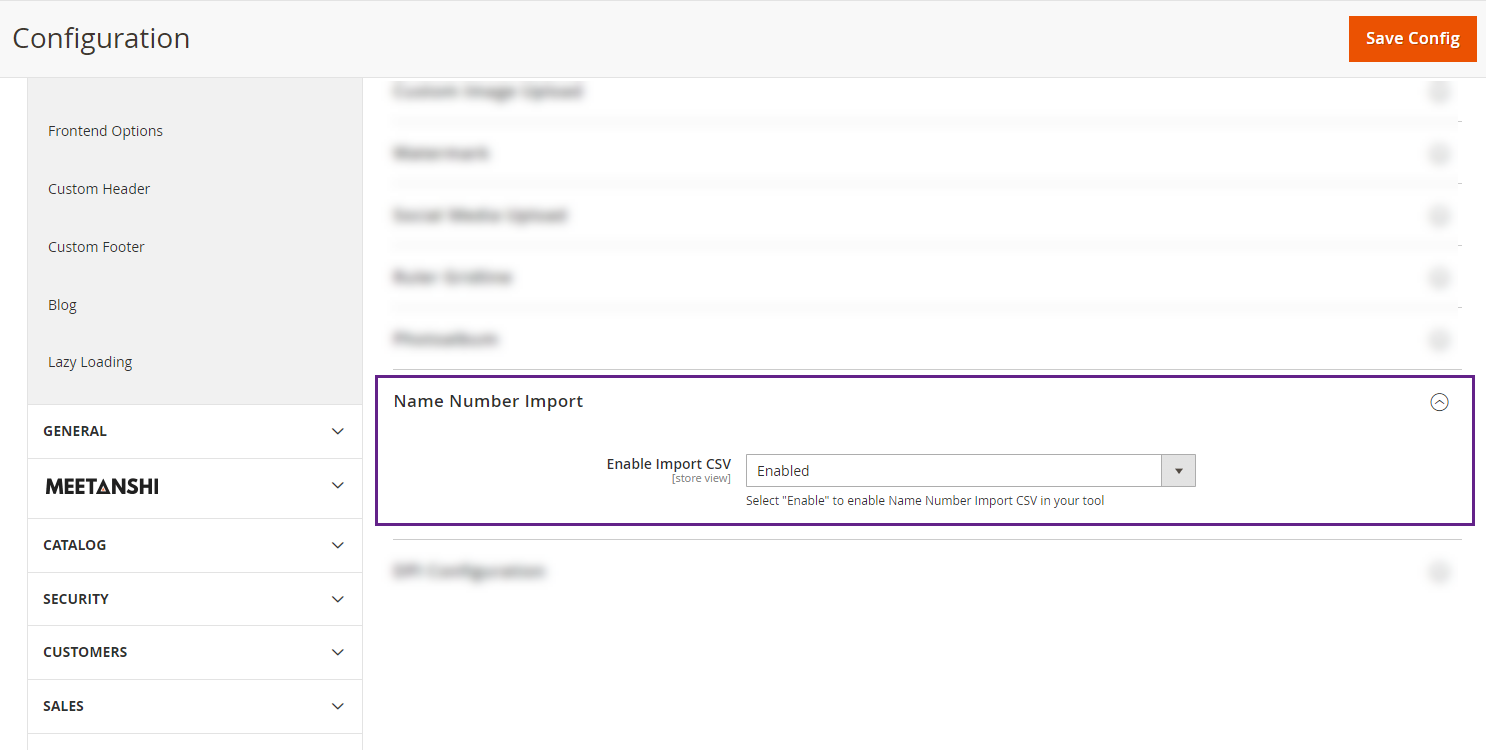
By scrolling down from the settings page, you will see the “Name Number Import” option. You need to expand the Name Number Import option by clicking on the arrow icon.
– Enable Import CSV: If you want to provide the CSV file and ZIP file support to import the Name Number on the designer tool, enable this option. By enabling this option, the customers can import multiple “Name Number and Logo” data for the product.
After configuring the Name Number, click on the Save button to save the changes.
Frontend View
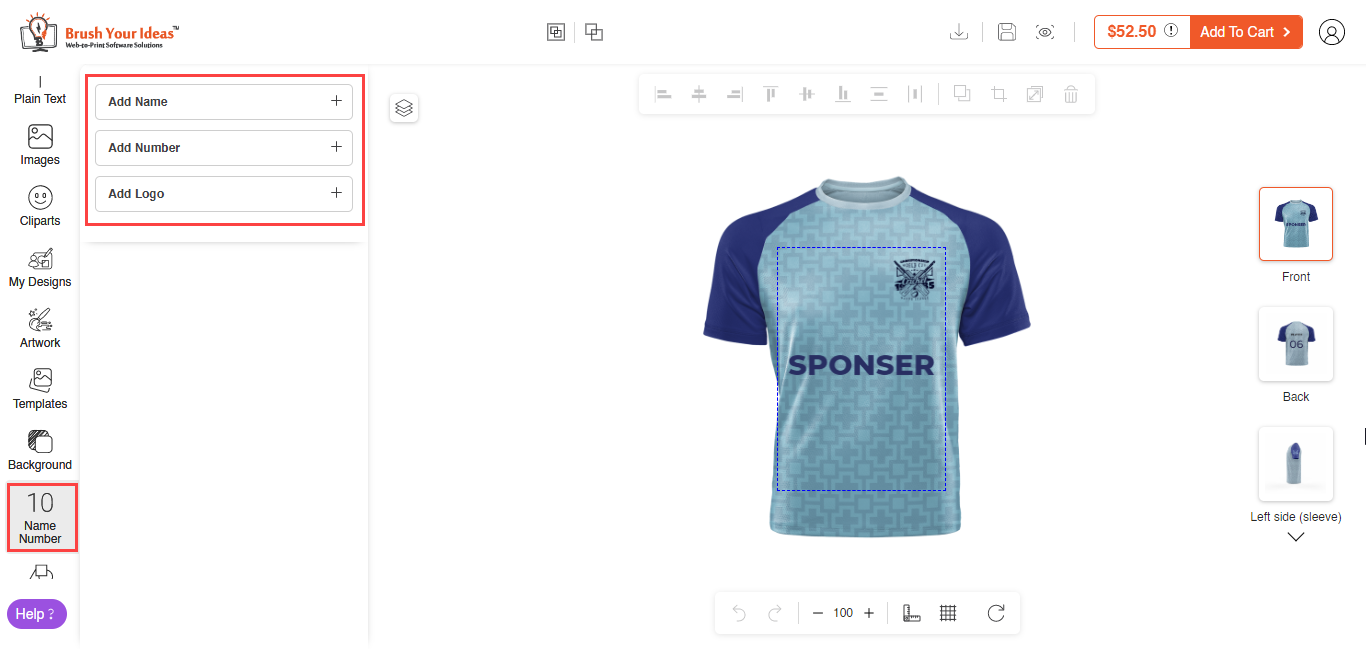
The customers will see the Name Number tab from the “Designer Explorer” panel on the left side. The customers can see the “Name Number and Logo” designer option in a sub-panel by clicking on it.
Now, the customers can add the Name, Number, and Logo of their choice on the product. They can Add Multiple Numbers and Names at a time to the product to design as they want.
Name Number tab
By clicking on the Add Name & Add Number button your customers can add their name and number to the product. [1]
By clicking on the Add Logo your customers can also add the Logo to the product. The logo added from the backend will be applied by default. [2]
This can be added on multiple sides and on multiple design areas as well. [3]
Add Name-Number data
By clicking the View Players button, the Name & Number Data popup will open. [1]
Your customers can set the name number details along with all the variants available for each record. By clicking on the Add More button, more records for Name & Number can be added. [2]
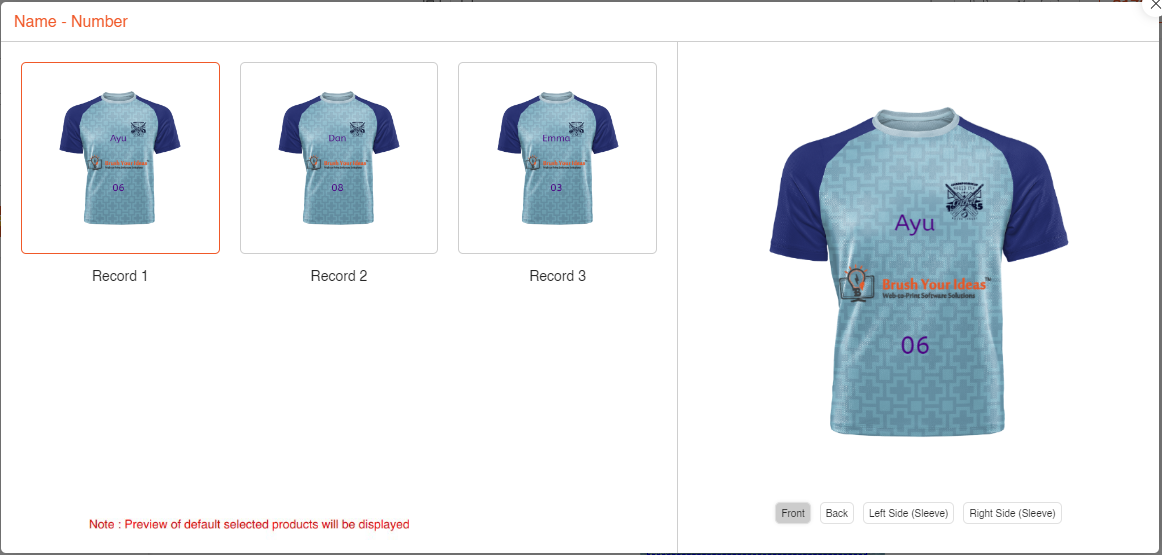
By clicking on the Preview All button customers can have a preview of all the records. [3]
All products according to the entered Name, Number and Logo are displayed. From here, the product can be viewed from “Front”, “Back”, “Left Side (Sleeve)” and “Right Side (Sleeve)”. [4] [5]
There is also a Preview All button present beside the View Players button, from there as well you can view the product. [6]
In the Name & Number tabs, you can have the sub-tabs through which you can change the properties of the text and images.
For Text, there are Font, Opacity, Stroke, Drop Shadow, and Object Position. For Image/Logo, there are Image Filters, Image Effects, Opacity, and Object Position. [7][8]
Note: Undo-Redo will be disabled by default for the Name & Number feature.
Import Name-Number Data
A CSV file or Excel file containing all the required details can be uploaded through the Import Section instead of manually entering all the data. To add Images/Logo, ZIP file including certain files that are mentioned can be added. [1]
Zip file should be uploaded intially. It has to be noted that the filename of the logo should be the same as mentioned in the CSV or Excel file. [4]
Then after, CSV file or an Excel file which includes all the data such as Name, Number, Logo, Color and Size should be uploaded. [2] [3]
Then after, the logo images’ zip file should be uploaded. It has to be noted that the filename of the logo should be the same as mentioned in the CSV or Excel file. [4]
When Preview All is clicked, all the products will be displayed with their respective Name, Logo and Number. [5]
Price Details & Add To Cart
The customers will see the pricing details once they click beside the Amount display. The customers will be charged as per the data of the Name & Number inserted. [1]
Add to Cart
After designing the product with Name and Number, when the customers add the product to the cart, the “Add To Cart” details pop-up will open on the right side.
The customers can see the Total Quantity as per inserted data of the Name and Number. For Example, Here, two data are added, which means two products with different Names and Numbers are added. [2]
The customers can also add products with different attributes as they want. Here, the two different attributes are selected. i.e., Large and Medium.
Now, by clicking on the Buy Now button, the customers will navigate to the “Checkout page”. They can see the Name / Number details and default attributes for the product. [3]
After clicking on the Buy Now button, Customers will land on the cart page. By clicking on the Display Name Number Data button they will get the Name Number Data popup. Here they can view the name number details added to the product. [4]
After reviewing the details, your customers can proceed to the checkout and place an order. Once the order is placed they will get the “Thank You” message along with the Order number. [5]
Sales Orders
Once the order is placed by your customers, you can view it by navigating to the Sales ➤ Orders, you will land on the listing page of the orders. [1]
Open the order by clicking on the View button, you will land on the Order Details page. Now, navigate to the Items Orders section below and click on the View Design button. [2]
By clicking on the button you can view the designs of the product and you can also download it. You can also view the Text, Name & Number Details on the page. [3] [4] [5]
Name & Number Responsive
Name & number is also a mobile responsive add-on. Here is how it will work on responsive devices.
The customers will see the Name Number tab in the “Designer Explorer” panel at the bottom. The customers can see the “Name Number” designer option in a sub-panel by tapping on it.
Now, the customers can add the Name, Number and Logo of their choice on the product. They can Add Multiple Numbers and Names at a time to the product to design as they want.
Add Name Number
By tapping on the Add Name & Add Number button your customers can add their name and number to the product. [1] [2]
By tapping on the Add Logo your customers can also add the Logo to the product. The logo which is added from the backend will be displayed as default. [3] [4]
Name & Number can be added on multiple sides as well. [5]
Add Name Number Data
By tapping on the View Player button, the Name & Number Data panel will open up. By tapping on the Add More button more records for Name & Number can be added. [1] [2]
Your customers can set the name number details along with the Color and Size for each record by tapping on the Edit icon of the particular record. They can also upload the Logo on the product as per their requirement. [3] [4]
By tapping on the Preview All button customers can have a preview of all the records. [5]
Also, by clicking on the Preview All button present beside the View Players you can view all the created records. [6]
Various side views of the product are available. [7]
In the Name & Number tabs, you can have the sub-tabs through which you can change the properties of the text and images. You can access these properties by tapping on the “View Player” button.
For Text, there are Font, Colors, Opacity, Stroke, Drop Shadow, Skew, and Object Position. For Image/Logo, there are Image Filters, Image Effects, Opacity, and Object Position. [8] [9]
Note: Undo-Redo will be disabled by default for the Name & Number feature.
Import Name Number Data
Your customers can also import the name and number data by navigating to the Import section beside the Data section. [1]
ZIP file should be uploaded initially. [2]
You can tap on the Sample CSV to download the sample file for reference. Once the sample file is downloaded then your customer can add data to it and upload the CSV in the Designer tool. [3]
Now the Name & Number data is available in the designer tool as per CSV file. [4][5]
Price Details & Add To Cart
The customers will see the pricing details once they tap on the (!) icon they can view the dynamic pricing of the product. The customers will be charged as per the data of the Name & Number inserted. [1]
Add to Cart
After designing the product with Name and Number, when the customers add the product to the cart, the “Add To Cart” details will pop up from the right side. The customers can see the Total Quantity as per inserted data of the Name and Number. For Example, Here, two data are added, which means two products with different Names and Numbers are added. [2]
In the Product Options, you can see the details of the product i.e. it’s size, color and quantity.
The customers can also add products with different attributes as they want. Here, the two different attributes are selected. i.e. Large and Medium.
Now, by tapping on the Buy Now button, the customers will navigate to the “Checkout page”. They can see the Name / Number details and default attributes for the product.
After tapping on the Buy Now button, Customers will land on the cart page. By tapping on the Display Name Number Data button they will get the Name Number Data popup. Here they can view the name number details added to the product. [3] [4]
After reviewing the details, your customers can click on Proceed to Checkout and continue with the order. [5]
After proceeding with the checkout, the shipping address section will be displayed. Here, the customers have to enter required details and then in the Payment section, select the Payment Method. Click on “Place Order” after completing the steps. [6] [7]
Click on “”Once the order is placed they will get the “Thank You” message with the Order number. [8]


![Add Name and Number[1]](https://docs.printxpand.com/wp-content/uploads/2021/08/image003-4.png)
![Add logo [2]](https://docs.printxpand.com/wp-content/uploads/2021/08/image005-5.png)
![Multiple sides [3]](https://docs.printxpand.com/wp-content/uploads/2021/08/image007-5.png)
![View Players Button [1]](https://docs.printxpand.com/wp-content/uploads/2021/08/image003-6.png)
![Add More Button [2]](https://docs.printxpand.com/wp-content/uploads/2021/08/image005-7.png)
![Preview All Button [3]](https://docs.printxpand.com/wp-content/uploads/2021/08/image007-6.png)

![Different sides of image [5]](https://docs.printxpand.com/wp-content/uploads/2021/08/image017-5.png)
![Preview All Button [6]](https://docs.printxpand.com/wp-content/uploads/2021/08/image009-6.png)
![Text Properties [7]](https://docs.printxpand.com/wp-content/uploads/2021/08/image013-6.png)
![Image Properties [8]](https://docs.printxpand.com/wp-content/uploads/2021/08/image011-7.png)
![Import Section [1]](https://docs.printxpand.com/wp-content/uploads/2023/04/image003.png)
![CSV File [2]](https://docs.printxpand.com/wp-content/uploads/2023/04/image027.png)

![Logo Images Zip File [4]](https://docs.printxpand.com/wp-content/uploads/2023/04/image031.png)
![[5] Preview All](https://docs.printxpand.com/wp-content/uploads/2023/04/Pre.png)
![Pricing Details [1]](https://docs.printxpand.com/wp-content/uploads/2021/08/image037-1.png)
![Cart Details [2]](https://docs.printxpand.com/wp-content/uploads/2021/08/image039-1.png)
![Buy Now [3]](https://docs.printxpand.com/wp-content/uploads/2021/08/image041-1.png)
![Name Number Data [4]](https://docs.printxpand.com/wp-content/uploads/2021/08/image043-1.png)
![Thank You message [5]](https://docs.printxpand.com/wp-content/uploads/2021/08/image045.png)
![Sales Order [1]](https://docs.printxpand.com/wp-content/uploads/2023/01/image037.png)
![Items Ordered [2]](https://docs.printxpand.com/wp-content/uploads/2023/01/image039.png)
![View Design [3]](https://docs.printxpand.com/wp-content/uploads/2023/01/image041.png)
![Text Details [4]](https://docs.printxpand.com/wp-content/uploads/2023/01/image043.png)
![Name Number Details [5]](https://docs.printxpand.com/wp-content/uploads/2023/01/image045.png)

![Add Name & Number [1]](https://docs.printxpand.com/wp-content/uploads/2023/04/image059-1.png)
![Name & Number [2]](https://docs.printxpand.com/wp-content/uploads/2023/04/image061-1.png)
![Add Logo [3]](https://docs.printxpand.com/wp-content/uploads/2023/04/image063-1.png)
![Logo [4]](https://docs.printxpand.com/wp-content/uploads/2023/04/image065-1.png)
![Multiple Sides [5]](https://docs.printxpand.com/wp-content/uploads/2023/04/image067-1.png)
![View Players button [1]](https://docs.printxpand.com/wp-content/uploads/2023/04/image069.png)
![Add More [2]](https://docs.printxpand.com/wp-content/uploads/2023/04/image071.png)
![Edit Details [3]](https://docs.printxpand.com/wp-content/uploads/2023/04/image073.png)
![Upload Image [4]](https://docs.printxpand.com/wp-content/uploads/2023/04/image075.png)
![Preview All Button [5]](https://docs.printxpand.com/wp-content/uploads/2023/04/image077.png)
![Preview All Button [6]](https://docs.printxpand.com/wp-content/uploads/2023/04/image080.png)
![Multiple Sides [7]](https://docs.printxpand.com/wp-content/uploads/2023/04/image082.png)
![Sub Tabs - For Text [8]](https://docs.printxpand.com/wp-content/uploads/2023/04/image084.png)
![Sub Tabs - For Images [9]](https://docs.printxpand.com/wp-content/uploads/2023/04/image086.png)
![Import Section [1]](https://docs.printxpand.com/wp-content/uploads/2023/04/image086-1.png)
![Import Logo Image Section [2]](https://docs.printxpand.com/wp-content/uploads/2023/04/image094.png)
![Sample CSV File [3]](https://docs.printxpand.com/wp-content/uploads/2023/04/image088.png)
![Name & Number Data [4]](https://docs.printxpand.com/wp-content/uploads/2023/04/image090.png)
![Name & Number Data [5]](https://docs.printxpand.com/wp-content/uploads/2023/04/image092.png)
![Pricing Details [1]](https://docs.printxpand.com/wp-content/uploads/2023/04/image096.png)
![Cart Details [2]](https://docs.printxpand.com/wp-content/uploads/2023/04/image098.png)
![Display Name Number Data [3]](https://docs.printxpand.com/wp-content/uploads/2023/04/image100.png)
![Name Number Details [4]](https://docs.printxpand.com/wp-content/uploads/2023/04/image102.png)
![Proceed to Checkout [5]](https://docs.printxpand.com/wp-content/uploads/2023/04/image104.png)
![Shipping Details [6]](https://docs.printxpand.com/wp-content/uploads/2023/04/image106.png)
![Payment Method [7]](https://docs.printxpand.com/wp-content/uploads/2023/04/image108.png)
![Thank You message [8]](https://docs.printxpand.com/wp-content/uploads/2023/04/image110.png)